Apple Kuchen

‘Tis the season for decadently festive recipes! Try this Apple Kuchen – we make it with our very own farm-grown apples!

Ingredients:

  • 1 egg
  • 1/2 tsp pure vanilla extract
  • Milk
  • 1 cup all-purpose flour
  • 1 tsp baking powder
  • 1/4 tsp salt
  • 3 tbsp sugar
  • 4 tbsp (1/2 stick) cold butter, cubed
  • 1 cup sugar
  • 2 tsp cinnamon
  • 3 tbsp melted butter
  • Peeled and sliced apples

Instructions:

  1. Preheat oven: Preheat the oven to 425º F. Butter a 9” x 13” baking pan, an extra-large deep-dish pie dish, or two round 8” cake pans.
  2. Prepare wet ingredients: In a measuring cup, beat together the egg, 1/2 tsp vanilla, and enough milk to make 1/2 cup.
  3. Prepare dry ingredients: In a food processor, combine flour, baking powder, salt, and 3 tbsp sugar. Add cold, cubed butter and pulse until the mixture resembles coarse crumbs.
  4. Combine wet and dry ingredients: Pour the wet ingredients into the dry ingredients and use the food processor to mix until just combined.
  5. Spread dough: Turn out the dough into the buttered baking pan and gently press it evenly to the edges.
  6. Add apple layer: Peel and slice enough apples to evenly cover the dough. Layer the apples on top of the dough.
  7. Prepare cinnamon sugar: In a separate bowl, mix 1 cup sugar, 2 tsp cinnamon, and 3 tbsp melted butter. Sprinkle this mixture over the apples.
  8. Bake: Bake in the preheated oven for 20-25 minutes or until the top is golden brown and a toothpick inserted into the center comes out clean.

Enjoy this festive Christmas breakfast treat! You can serve it warm with a dollop of whipped cream or a scoop of vanilla ice cream for an extra special touch.

You can find more holiday recipes and crafts on our farm blog!


Toilet Paper Tube Trees

The holidays are a great time to gather up the kiddos and make fun Christmas crafts. The great thing about this particular project is that one of the supplies is abundant in most households: empty toilet paper tubes.

You’ll need:
Scissors
Pencil
Paint and brushes
Glitter, puffballs, sequins, or whatever glitzy doodads your heart desires
Empty toilet paper tubes

To make:
Using the pencil, draw out the shape of tree you’d like, make sure that the points of your tree meet at the side. Leave enough room at the bottom for a base.

Carefully cut along the lines (parents can do this for the real little ones). Once your tree is cut out, paint the trees whatever color you or your little ones like. Washable acrylic paint is great for clothes and table tops. 


Once the pain dries, decorate your trees with pain, glitter, stickers, etc. The kids can even stick a photo of themselves on the tree as a cute gift to the grandparents!

Visit our blog for more holiday crafts, recipes and more!

Paint-Your-Own Ornaments

Paint-Your-Own Ornaments

What better way to celebrate the holidays than to get the family involved in a craft or two! Try this Paint-Your-Own Ornaments craft! Kiddos (along with Mom and Dad) can paint their favorite Christmas characters like Santa or Rudolph or glue a photo of themselves onto the ornament as a holiday gift to Grandma and Grandpa!

You’ll need:

Wooden ornaments
Acrylic paint
Ribbon
Photos and glue if making a photo ornament
String to hang

To make:

Prep a work area to keep the paint off any furniture. Give your kids the materials and let ’em have at it!

Visit our blog for more fun holiday crafts!

Dried Orange Garland

Dried Orange Garland

You’ve picked the perfect Christmas tree. Now it’s time to trim it! Beautiful ornaments don’t have to be store bought and original tree garlands were often made from natural items such as dried fruit, cinnamon sticks, popcorn, etc. Try this easy garland made of dried orange slices and ribbon!

You’ll need:

  • 2 medium oranges
  • Thin ribbon
  • Scissors
  • Yarn needle
  • Cooling rack

To make:

Preheat the oven to 200 degrees. Cut the oranges into 2 cm slices. Blot the slices with paper towels to remove some of the moisture (this will help them dry faster). Place the orange slices on a cooling rack. Turn the slices every half hour for 2-3 hours. 

Using the yarn needle, poke a hole near the top of the orange and run the ribbon through. That’s it! Time to decorate your tree!

Visit our blog for more holiday tips and tricks!

Toilet Paper Tube Ornaments

Toilet Paper Tube Ornaments

You can’t beat handmade Christmas ornaments. They’re a fun craft the whole family will enjoy and they can often be made with items lying around the house. This DIY ornament repurposes empty toilet paper tubes. Kind of fitting for 2020, no? Giggle.

You’ll need:

Empty toilet paper tubes
Paint
Paint brush
Ruler
Pencil
String

To make:

Paint outside of tube and allow to dry
Paint inside of tube and allow to dry
Using a ruler, draw a ½  inch thick around the middle of the tube.
On one side of the tube, cut equal strips (should wind up with eight) and cut those into triangles.
On the other side of the tube, do the same making sure strips are slightly off set.
Fold triangles towards middle of tube.
Tie string around middle of the tube.

Mom Tip: Lay down wax or parchment paper to save your table for little paint-covered hands.

Hang on the Christmas tree and enjoy!

Check out our blog for other crafts, recipes, and general farm fun!

Hot Cocoa With a Kick

Hot Cocoa With a Kick

Winters here in Tennessee can be chilly which makes the special ingredient in this hot cocoa so perfect! A touch of chili powder gives this traditional cold-weather beverage a  bit of kick!

You’ll need:
2 ½ cups milk
½ cup semi sweet chocolate chips
¼ cup unsweetened cocoa powder
½ teaspoon vanilla (pure or extract both work)
¼ teaspoon cinnamon
¼ teaspoon chili powder
Pinch of nutmeg
Sugar to taste (optional)

To make:
Combine all ingredients into a saucepan and heat over medium heat until the chocolate is melted and nearly simmering. Stir frequently. Taste and add sugar, if necessary. 

Follow us on Pinterest for more tasty treat ideas!

Salt Dough Ornaments

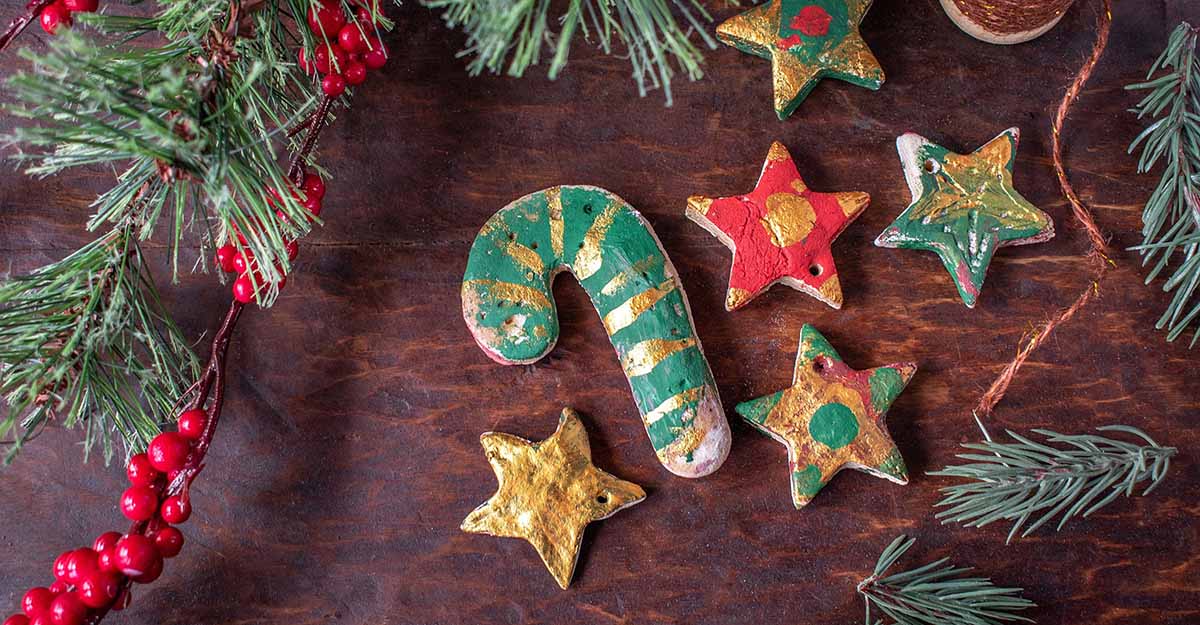
What better way to trim your farm-fresh Christmas tree than with homemade ornaments! Kids will enjoy seeing their fun creation hanging on the tree for years to come. Here’s a simple ornament made from common household ingredients! 

You’ll need: 

Dough
4 cups all-purpose flour
1 cup salt
1 ½ cups warm water

Tools
Parchment paper
Rolling pin
Cookie cutters
Baking sheet

Decor
Forks, stamps, lace, or anything else to make a pattern
Straw or toothpick (to poke a hole to hang the ornament)
Baking sheet
Paint, glitter, etc.
Mod Podge or Polyurethane spray (for sealing/preserving)
Ribbon or twine for hanging ornament

To Make:

Mix flour and salt in a large bowl until well combined. Slowly stream in warm water while stirring. Keep stirring until all water has been added. 

When it gets to a point where the dough is too thick to stir with a spoon, put it on a lightly floured surface and knead until it’s smooth and pliable.

Put the dough down on a sheet of parchment paper and cover with another sheet of parchment paper. Roll until about 1/8 “ thick (reduces likelihood of air pockets and future breakage). 

Remove the top sheet of parchment paper and, keeping dough on top of the bottom layer of parchment paper, use cookie cutters to cut out ornament shapes.  

Once all shapes have been cut, peel away all the excess dough, leaving shapes on the parchment paper. Use a straw or toothpick to poke a hole where the ornaments will hang. If you’re going to add texture elements to your ornaments, now’s the time to do it.

Move your ornaments and parchment paper onto a baking sheet and bake at 300 degrees for an hour. Allow to cool thoroughly before decorating. 

After you’ve decorated your ornaments, paint with a layer of Mod Podge or spray with Polyurethane to preserve.

Visit us on Pinterest for more festive DIY ideas!